AutoIncorrect

AutoIncorrect hosted on GitHub Pages
AutoIncorrect is a project that I made to practice using HTML, CSS, and JavaScript without any libraries like jQuery or React. It accepts an input string from the user and generates an output string that includes realistic typos. It models and displays a keyboard on the screen. It uses the keyboard model to create realistic typos based on the homerow keys, the error frequency and severity settings entered by the user, and the relative position and distance of keys from each other in the keyboard model. To give the feeling of working on an old computer it also animates through the input string, highlights keys on the keyboard display and shows a cursor highlight in both the input and output fields. And it uses the browser AudioContext to make beeping sounds.
The Set Up
AutoIncorrect has one HTML file, index.html, one CSS file, style.CSS, and many javascript files that are contained in the folder called modules.
index.html
The index.html file is pretty simple. The keyboard buttons for the keyboard display are added using JavaScript, so the HTML is just responsible for the basic layout.
- Import the Roboto font
- Import the CSS stylesheet
- Header with the title in it
- Div that will contain settings checkboxes/sliders
- The GO button
- The keyboard div
- The input container
- The div behind the input container that will contain the cursor
- The output container
The index.html file
1
2
3
4
5
6
7
8
9
10
11
12
13
14
15
16
17
18
19
20
21
22
23
24
25
26
27
28
29
30
31
32
33
34
35
36
37
38
39
40
41
42
43
44
45
46
47
48
49
50
51
52
53
54
55
56
57
58
59
60
61
blockName: indexHTML
<!DOCTYPE html>
<html lang="en">
<head>
<meta charset="utf-8" />
<title>AutoIncorrect</title>
<meta name="description" content="Automatic Typos to save you time!" />
<meta name="author" content="Jacob Wicks" />
<link
href="https://fonts.googleapis.com/css?family=Roboto&display=swap"
rel="stylesheet"
/>
<link rel="stylesheet" href="style.css" />
</head>
<body>
<h1 class="header header--big">AutoIncorrect</h1>
<div class="settings"></div>
<br />
<button id="addTyposButton">GO!</button>
<div class="centering-div">
<div class="container">
<div class="big__character__display">
<div class="current__input">
<span
class="keyboard__key keyboard__key--big"
id="currentInputSpan"
>
</span>
<span class="big" id="arrow">🡆</span>
<span
class="keyboard__key keyboard__key--big"
id="currentOutputSpan"
> </span
>
</div>
</div>
<br />
<div class="keyboard"></div>
</div>
<div class="input__output__container">
<div class="left__side">
<div class="input__container">
<h3 class="header">Input</h3>
<div class="backdrop">
<div class="highlights">
<!-- cloned text with <mark> tags here -->
</div>
</div>
<textarea id="inputTextarea"></textarea>
</div>
</div>
<div class="right__side">
<h3 class="header">Output</h3>
<div class="output"></div>
</div>
</div>
</div>
<script type="module" src="setup.js"></script>
</body>
</html>
Use the ‘Roboto’ font from Google.
Gets the stylesheet for autoIncorrect.
The current input and outpouts are displayed here.
The keyboard div will be filled up with keys generated from the model.
User types their input text into the textarea.
The ‘backdrop’ div floats behind the input text. We put a mark element inside the backdrop to make it appear as though the text in the input textarea is highlighted.
Import the JavaScript for autoIncorrect.
style.css
The css file uses the outset border to makes the keyboard keys look 3d. It sets the colors, including bright green for highlighting the current input and red to show when a typo has been made. It also has the custom styling for the slider and checkbox elements.
Keyboard keys with the 3d effect
1
2
3
4
5
6
7
8
9
10
11
12
blockName: keysCSS
/* a keyboard key displays a single letter
    it will appear in the keyboard
    but also in the big display of inputs
*/
.keyboard__key {
    border-style: outset;
    display: inline-block;
    height: 25px;
    width: 25px;
    text-align: center;
}
Comment boxes
1
2
3
4
5
6
7
8
9
10
11
12
13
14
15
blockName: commentsCSS
/* the content of the comment
max-height starts at three lines collapsed */
.line_comment_content {
    position: relative;
    max-height: calc(var(--lh) \* 3);
    transition: max-height 1s ease-out;
    overflow: hidden;
    padding-right: 1rem;
}

/* when hovered, max height becomes 100% of the viewport height */
.line_comment_content:hover {
    max-height: 100vh;
}
max-height is calculated using calc, the CSS calculation function. lh is a variable equal to the height of one line of text.
transition defines the animation to be used on a given property. This tells the CSS processor to animate transitions when max-height changes with the ‘ease-out’ animation. 1s makes the animation happen over 1 second.
When the comment is hovered, max-height becomes 100vh, or 100% of the viewport-height. In other words, the limit on the comment height changes from 3 lines of text to the full height of the window. This is used on desktop. Some mobile devices can do a hover input, but it is not convenient, consistent, or intuitive.
Big output display keys
1
2
3
4
5
6
7
/* big keyboard keys are used to show the current character */
.keyboard__key--big {
    width: 120px;
    height: 120px;
    font-size: 6em;
    background-color: #c0c0c0;
}
Cursor
1
2
3
4
5
6
7
8
9
10
11
/* the mark element is used for highlighting text
    We use it to simulate a computer cursor*/
mark {
    border-radius: 3px;
    color: black;
    background-color: #39ff14;
}

.mark__mistake {
    background-color: red;
}
Heres an example of mark element: See?
Highlight and mistake colors
1
2
3
4
5
6
7
8
9
10
blockName: cssColors
/* key is highlighted */
.highlighted {
    background-color: #39ff14;
}

/* the key is a mistake, so it is red */
.mistake {
    background-color: red;
}
Neon green.
Backdrop element
1
2
3
4
5
6
7
8
9
10
11
12
13
14
15
16
17
18
19
20
21
/* the backdrop div sits behind the input textarea
    We put mark elements inside it to fake like we have a cursor in the textarea*/
.backdrop {
    position: absolute;
    z-index: 1;
    border: 2px solid #50b818;
    background-color: #fff;
    overflow: auto;
    pointer-events: none;
}

/* dimensions of the textarea and backdrop must be the same
so that they overlap completely
output should match for aesthetics
*/
.backdrop,
textarea,
.output {
    width: 350px;
    height: 180px;
}
Slider and Checkbox styling
1
2
3
4
5
6
7
8
9
10
11
12
13
14
15
16
17
18
19
20
21
22
23
24
25
26
27
28
29
30
31
32
33
34
35
36
37
38
39
40
41
42
43
44
45
46
47
48
49
50
51
52
53
54
55
56
57
58
59
60
61
62
63
64
65
66
67
68
69
70
71
72
73
74
75
76
77
78
79
80
81
82
83
84
85
86
87
88
89
90
91
92
93
94
95
96
97
98
99
100
101
102
103
104
105
106
107
/* slider */
.slider {
    -webkit-appearance: none;
    width: 90%;
    height: 25px;
    background: #c0c0c0;
    outline: none;
    opacity: 0.7;
    -webkit-transition: 0.2s;
    transition: opacity 0.2s;
}

/* darken (less transparent) when hovered */
.slider:hover {
    opacity: 1;
}

/* slider handle */
.slider::-webkit-slider-thumb {
    -webkit-appearance: none;
    appearance: none;
    width: 25px;
    height: 25px;
    background: black;
    cursor: pointer;
}

/* slider handle for firefox */
.slider::-moz-range-thumb {
    width: 25px;
    height: 25px;
    background: black;
    cursor: pointer;
}

/* Checkboxes */
/* Create a custom checkbox */
.checkbox__container {
    display: inline-block;
    position: relative;
    padding-left: 35px;
    margin-bottom: 12px;
    cursor: pointer;
    font-size: 22px;
    -webkit-user-select: none;
    -moz-user-select: none;
    -ms-user-select: none;
    user-select: none;
}

.float__right {
    float: right;
    margin-right: 35px;
}

/* Hide the browser's default checkbox */
.checkbox__container input {
    position: absolute;
    opacity: 0;
    cursor: pointer;
    height: 0;
    width: 0;
}

.checkmark {
    position: absolute;
    top: 0;
    left: 0;
    height: 25px;
    width: 25px;
    background-color: #eee;
}

/* On mouse-over, add a grey background color */
.checkbox__container:hover input ~ .checkmark {
    background-color: #ccc;
}

/* When the checkbox is checked, add a blue background */
.checkbox__container input:checked ~ .checkmark {
    background-color: black;
}

/* Create the checkmark/indicator (hidden when not checked) */
.checkmark:after {
    content: '';
    position: absolute;
    display: none;
}

/* Show the checkmark when checked */
.checkbox__container input:checked ~ .checkmark:after {
    display: block;
}

/* Style the checkmark/indicator */
.checkbox__container .checkmark:after {
    left: 9px;
    top: 5px;
    width: 5px;
    height: 10px;
    border: solid #50b818;
    border-width: 0 3px 3px 0;
    -webkit-transform: rotate(45deg);
    -ms-transform: rotate(45deg);
    transform: rotate(45deg);
}
setup.js
setup.js is imported into index.html as a module so that it can import javascript from the other files in the modules folder. Setup does the following:
Get references to commonly used page elements
1
2
3
4
5
6
7
8
9
10
11
12
13
14
15
16
17
blockName: display
 //the display object contains references to commonly accessed elements in the page
    //it will be passed as an argument to functions that need it
    const display = {
        //these are the big displays above the keyboard
        currentInputSpan: document.getElementById('currentInputSpan'),
        currentOutputSpan: document.getElementById('currentOutputSpan'),
        arrowSpan: document.getElementById('arrow'),

        //the text area where the user typed their input
        inputTextarea: document.getElementById('inputTextarea'),

        //the div where the output is displayed
        outputDiv: document.getElementsByClassName('output')[0],

        settingsDiv: document.getElementsByClassName('settings')[0],
    };
Getting the references during setup means we can just pass the display object instead of finding the objects on the page again when they need to be manipulated.
Creates the keyboard. This is how the keyboard is displayed on screen:
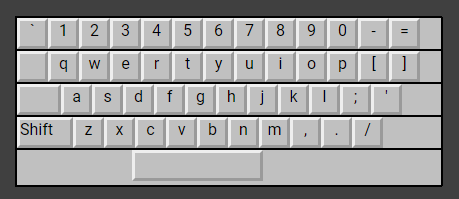
The onscreen display is made using a model in the form of an array of arrays of objects that contain an uppercase value and a lowercase value. The typos are also generated by looking at the relationship of keys inside this model.
Modeling the Keyboard
The getKeyBoard function creates the model of the keyboard. The model of the keyboard is created from these strings:
1
2
3
4
5
6
7
8
9
10
11
12
13
14
//string for the lowercase characters in row0
const row0Lower = '`1234567890-=';
//string for the uppercase characters in row0
const row0Upper = '~!@#\$%^&\*()\_+';

    const row1Lower = 'qwertyuiop[]';
    const row1Upper = 'QWERTYUIOP{}|';

    //double quotes because the single quote is in this row
    const row2Lower = "asdfghjkl;'";
    const row2Upper = 'ASDFGHJKL:"';

    const row3Lower = 'zxcvbnm,./';
    const row3Upper = 'ZXCVBNM<>?';
The makeRow function creates a keyboard row array from two strings.
1
2
3
4
5
6
7
8
9
//makeRow accepts two strings and returns an array of objects with lower and upper properties
//we'll use it to make row arrays for our keyboard model
const makeRow = (rowLowercase, rowUppercase) =>
    Array.from(rowLowercase).map((lower, index) => ({
        //the lowercase character
        lower,
        //the uppercase character
        upper: rowUppercase.charAt(index),
    }));
The getKeyboard function returns an array of arrays made using makeRow:
1
2
3
4
5
6
7
return [
    makeRow(row0Lower, row0Upper),
    makeRow(row1Lower, row1Upper),
    makeRow(row2Lower, row2Upper),
    makeRow(row3Lower, row3Upper),
    row4,
];
The offset values determine how many key-widths the start of a row is offset from the left side:
offsets: [0, 1, 1.5, 2, 4],The offset values are used in both the display and when calculating the distance between keys.
Displaying the keyboard on the screen
1
2
3
4
5
6
7
8
9
10
11
12
13
14
15
16
17
18
19
20
21
22
23
24
25
26
27
28
29
30
31
32
33
34
35
36
37
38
39
40
41
42
43
44
45
46
47
48
49
50
51
52
53
54
55
56
57
58
59
60
61
62
63
64
65
//displays all the keys from the keyboard on the screen
//as span elements inside the keyboard div
const setupKeyboardDisplay = ({ keyboard, offsets }) => {
//use html api to select the keyboard div
//reference this variable to add keys to the keyboard
const keyboardDiv = document.querySelector('.keyboard');
//add each key in keyboard to the keyboardDiv
keyboard.forEach((row, rowIndex) => {
//the div that represents this row
const thisRowDiv = document.createElement('div');
//we can find it again later by searching for id
thisRowDiv.setAttribute('id', `row${rowIndex}`);
//the css class for keyboard row
thisRowDiv.setAttribute('class', 'keyboard__row');
//if the keys are offset, make a blank key to put on the left
if (!!offsets[rowIndex] && rowIndex < 4) {
const blankKeySpan = document.createElement('span');
//assign the css class
blankKeySpan.setAttribute('class', 'keyboard__blank');
//without a non breaking space the span will render with a height offset
blankKeySpan.innerHTML = ' ';
//width of a key - 25 pixels - times the offset width
blankKeySpan.style.width = `${Math.ceil(
25 * offsets[rowIndex]
).toString()}px`;
if (rowIndex === 3) {
blankKeySpan.innerHTML = 'Shift';
blankKeySpan.setAttribute('id', 'shiftKey');
}
//add the blank to the row
thisRowDiv.appendChild(blankKeySpan);
}
if (rowIndex < 4) {
row.forEach(key => {
//the space breaks. the non-breaking space doesn't
key.lower === ' ' && (key = ' ');
const thisKeySpan = document.createElement('span');
thisKeySpan.setAttribute('id', `keyCharacter${key.lower}`);
thisKeySpan.setAttribute('class', 'keyboard__key');
thisKeySpan.innerHTML = key.lower;
thisRowDiv.appendChild(thisKeySpan);
});
} else {
//it's the spacebar, which gets special treatment
//if you change the model, you may have to change this code
const spacebarSpan = document.createElement('span');
//keyCharacter followed by a space ' ';
spacebarSpan.setAttribute('id', 'keyCharacter ');
spacebarSpan.setAttribute('class', 'keyboard__spacebar');
thisRowDiv.appendChild(spacebarSpan);
}
keyboardDiv.appendChild(thisRowDiv);
});
};
Use the typo functions to add typos to the header
1
2
3
4
5
6
7
8
9
10
11
12
13
14
15
16
17
18
19
20
21
22
23
24
25
26
27
28
29
30
31
blockName: addTyposToHeader
//uses the typo generating code to introduce typos to the big title header
const addTyposToHeader = keyboardModel => {
    //get reference to the big title header
    const bigHeader = document.getElementsByClassName('header--big')[0];
    //grab the innerHTML as an inputString
    const inputString = bigHeader.innerHTML;

    //create a settings object
    const settings = {
        extraCharacters: 5,
        frequency: 10,
        missedCharacters: 15,
        severity: 1,
        transposition: 30,
    };

    //use the typo functions to add typos to the header
    const resultArray = getResults({
        inputString,
        keyboardModel,
        settings,
    });

    //reduce it to a string
    const headerWithTypos = resultArrayToString(resultArray);

    //set the innerhtml to the string with typos
    bigHeader.innerHTML = headerWithTypos;

};
Set initial Settings
1
2
3
4
5
6
7
8
9
10
11
12
13
14
15
16
17
18
19
20
21
22
23
24
25
26
27
28
29
30
blockName: settings
    //the settings for the typos
    const settings = {
        //audioContext will store an AudioContext player after the createAudioContext function has been called
        audioContext: undefined,
        //if animation is true, the animation of input to output will play
        //if false, output will be displayed instantly
        animation: true,

        //if beeps is true, you'll hear some excellent beeping noises
        beeps: true,

        //%chance to add an extra character on a typo
        extraCharacters: 20,

        //frequency is a number 0-100
        //it is the % chance that a typo will occur
        frequency: 20,

        //%chance to miss a character on a typo
        missedCharacters: 20,
        //weightSeverity is a number 1-4
        //it changes how likely it is that typos are more 'severe', or farther from the intended key
        //the higher the number, the more likely it is that a typo will select a key that is far from the intended key
        //the lower the number, the more likely a typo will select a key close to the indended key
        severity: 2,

        //the likelihood of transposing the current character with the next character
        transposition: 40,
    };
The settings div is where the user can change the settings. This is what it looks like:
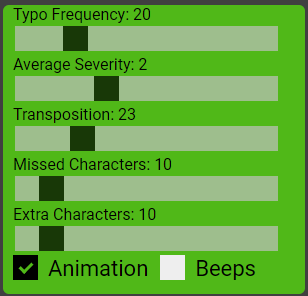
Set up the settings div, where the user can change settings
1
2
3
4
5
6
7
8
9
10
11
12
13
    blockName: setUpSettingsDiv
    //sets up the settings div by adding sliders and checkboxes
    const setupSettingsDiv = ({ display, settings }) => {
        const { settingsDiv } = display;

        //add the sliders
        addSlidersToSettingsDiv({ settingsDiv, settings });

        //add the checkboxes
        addCheckboxesToSettingsDiv({ settingsDiv, settings });

    };
addSlidersToSettingsDiv
1
2
3
4
5
6
7
8
9
10
11
12
13
14
15
16
17
18
19
20
21
22
23
24
25
26
27
28
29
30
31
32
33
34
35
36
37
38
39
40
41
42
43
44
45
46
47
48
49
50
51
52
53
54
55
56
57
58
59
60
61
blockName: addSlidersToSettingsDiv
const addSlidersToSettingsDiv = ({ settingsDiv, settings }) => {
    //% chance that a typo will occur
    const frequencySlider = makeSlider({
        label: 'Typo Frequency: ',
        name: 'frequency',
        value: settings.frequency,
    });

    //weights how bad the typo will be
    //worse typos result in a character farther from the target character
    const severitySlider = makeSlider({
        label: 'Average Severity: ',
        name: 'severity',
        min: 1,
        max: 4,
        value: settings.severity,
    });

    //% chance that a typo will add an extra character
    //will not be called if the typo is a missed character
    //Examply: intended to type 'why?' h is typoed to j, becomes 'wjjy?'
    const extraCharactersSlider = makeSlider({
        label: 'Extra Characters: ',
        name: 'extraCharacters',
        value: settings.extraCharacters,
    });

    //% chance that a typo will be a missed character
    //nothing will be typed
    //Example: intended to type 'why?' h is missed, becomes 'wy?'
    const missedCharactersSlider = makeSlider({
        label: 'Missed Characters: ',
        name: 'missedCharacters',
        value: settings.missedCharacters,
    });

    //% chance that a typo will transpose the intended letters
    //Example: Intended to type 'why?', w and h transposed becomes 'hwy?'
    const transpositionSlider = makeSlider({
        label: 'Transposition: ',
        name: 'transposition',
        value: settings.transposition,
    });

    //add each slider to the settingsDiv
    settingsDiv.appendChild(frequencySlider);
    settingsDiv.appendChild(severitySlider);
    settingsDiv.appendChild(transpositionSlider);
    settingsDiv.appendChild(missedCharactersSlider);
    settingsDiv.appendChild(extraCharactersSlider);

    //the controlSlider function bound to the settings object
    const bindSlider = name => controlSlider.bind(null, name, settings)();

    //hook sliders to the settings object and value display elements
    bindSlider('frequency');
    bindSlider('severity');
    bindSlider('extraCharacters');
    bindSlider('missedCharacters');
    bindSlider('transposition');
controlSlider
1
2
3
4
5
6
7
8
9
10
11
12
13
14
15
16
17
blockName: controlSlider
//control slider accepts a name
//and hooks up the slider element to the value in the settings object
//and the value shown in the display element
const controlSlider = (name, settings) => {
    //find the slider
    const thisInput = document.getElementById(`${name}Slider`);

    // Update the current slider value (each time you drag the slider handle)
    thisInput.oninput = function() {
        const setting = this.value;
        const thisDisplay = document.getElementById(`${name}Display`);
        settings[name] = setting;
        thisDisplay.innerHTML = setting;
    };

};
makeSlider
1
2
3
4
5
6
7
8
9
10
11
12
blockName: makeSlider
//makes a slider element with the given label and value
const makeSlider = ({ label, max = 100, min = 0, name, value }) => {
    const slider = document.createElement('div');

    slider.setAttribute('class', 'slider__container');

    slider.innerHTML = `${label}<span id="${name}Display">${value}</span><input type="range" min="${min}" max="${max}" value="${value}" class="slider" id="${name}Slider"/>`;

    return slider;

};
Make the GO button work
1
2
3
4
5
6
7
8
9
10
11
12
13
14
15
16
17
    blockName: addTyposEventListener
        //make clicking the 'GO' button invoke the addTypos function
        document.getElementById('addTyposButton').addEventListener('click', () => {
            //if beeps are on and audioContext is undefined, call the makeAudioContext function
            //we don't do this until the user clicks
            //because you can't create an audio context without some action by the user
            settings.beeps && !settings.audioContext && makeAudioContext(settings);

            //use .bind to pass the keyboardModel and settings to the addTypos function
            addTypos.bind(null, {
                display,
                keyboardModel,
                settings,
            })();
        });
How the Typos Work
First, the program generates a model of a keyboard from strings that represent the uppercase and lowercase characters in each row. The model is an array of arrays, with each array representing a row of uppercase and lowercase characters. This model is used to generate the display and to generate typos by finding keys that are near the target key or on the path from the target key to the closest key in the homerow. There are functions for finding a specific key on the keyboard, finding the keys on the path from one key to another, and finding keys that are near to a key.
There is also an array of offset values that determine how many key-widths the start of a row is offset from the left side. The offset values are used in both the display and when calculating the distance between keys.
The Settings box contains inputs for each of the settings: frequency, severity, transposition, missedCharacters, and extraCharacters. The Settings box also lets the user turn animation and sound on or off.
The user types an input string into the input field. When the user hits the GO! button, the program reads the input string, generates an array of input and output characters, then displays the output in the output div. If the user has animations or sound turned on, then the animations and/or sound will play as the output is displayed.
Making a Typo
For each character in the input string, we first see if it is present in the keyboard model. The model just has the upper and lower case keys from my laptop keyboard, so it is possible that the user will enter a key that isn’t in the model. If it isn’t in the model string then we add the character to the output array without making a typo.
Use the Settings to Decide if a Typo has Been Made
If the character is present in the keyboard model then we use the settings to see if we should generate a typo. If a randomly generated integer from 1-100 is less than frequency, a typo has been made. The typo function is called with the keyboard model and the settings, and it returns the mistake.
The typo function uses the model of the keyboard to figure out which key has been hit by mistake. Reacll that the model of the keyboard is an array of arrays. The typo function finds the index of the target key. Then it finds all the keys that are within 1 or 2 keys of the target key. It also finds all the keys on the path from the target key to the closest key in the homerow. The array of keys on the path is sorted from closest to the target to farthest.
Once it has found all the possibly typos from the target key, the typo function calls a weighted random number generator. The weighted random number generator may return the full range from min to max, but tends to pick numbers towards the min value. The higher the value of the ‘severity’ setting, the more likely the weighted random number generator is to return a higher value. The weighted number generator is used to determine if a key on the path or one of the surrounding keys is selected, and then used to select the key on the path. Using the weighted number generator to choose from the array of keys on the path makes it more likely that the typo will be a key close to the target key, which makes the typos more realistic.
Displaying the Typos
If the user doesn’t have animation turned on, then the result array is reduced to an output string and put into the output container on the screen.
If the user has animation turned on, then the animation function is called with the result array. For each character in the input string the animation function highlights the target key on the keyboard, puts a cursor in the input textarea, puts a cursor in the output div, and highlights the result in red on the keyboard if a mistake is made. The input and output characters are also displayed in the large boxes above the keyboard.
Making Noise
If sound is turned on the web browser audioContext will be used to make a beeping noise for each input character. The tone of the beep corresponds to the row on the keyboard. If a typo is made then the tone changes to indicate a typo.
The Functions
Random Numbers
Generating random numbers is an important part of deciding whether to make a typo for any given input character. Random numbers are also used to select the character that results from the typo. Here is the getRandomInt function. It can generate random integers between any requested values. By default it will generate a number between and including 1-100. getRandomInt is used throughout the program wherever we need a random integer.
getRandomInt
1
2
3
4
5
6
7
8
9
10
11
12
13
blockName getRandomInt
//returns a random integer
//if no min and max, 1-100
const getRandomInt = (min = 1, max = 100) => {
    min = Math.ceil(min);

    max = Math.floor(max);

    max < min && (max = min + 1);

    return Math.floor(Math.random() * (max - min + 1)) + min;

};
Math.ceil rounds a number up to the nearest integer.
Math.floor rounds a number down to the nearest integer.
If max was less than min, set it to min + 1.
Math.random generates a decimal between 0 and 1. Multiply it by the result of max - min + 1. Then add min to the result to ensure that the minimum result is equal to the requested minimum value.
severityWeightedRandomNumber is another random number generating function. It will generate a random number inside the requested range, but is designed to be more likely to generate a lower number.
It is used to pick typos from the array of possible typos for a given input. The arrays are sorted from the most likely key to be struck to the least likely. So by picking from the low end of the range more often we generate the most likely typos more than the least likely.
Severity is a setting that the user can change. Severity makes the typos worse by making it more likely to pick keys that are farther away from the intended key on the keyboard. Increasing the value of severity will make severityWeightedRandomNumber more likely to pick a higher number.
severityWeightedRandomNumber
1
2
3
4
5
6
7
8
9
10
11
12
13
14
15
16
17
18
19
20
21
22
23
24
25
26
blockName severityWeightedRandomNumber
//returns a random integer betweeen/including min and max
//weighted toward returning min
//the higher the value of severity, the more likely to return max
const severityWeightedRandomInt = (min, max, severity) => {
    //increment min and max for rounded calculation
    min++;
    max++;

    //this generates a number that is weighted toward the min value
    //max divided by a random percentage of max plus min
    const rounded = Math.round(max / (Math.random() * max + min)) - 1;

    //value of severity may be 1-4
    //if severity is greater than a random int,
    if (getRandomInt(1, 3) < severity) {
        //decrement max back down to provided value
        max--;
        //add a random int up to the value of severity to the result
        const result = rounded + getRandomInt(0, severity);

        //if result is greater than max, return max
        return result > max ? max : result;
    } else return rounded;

};
Navigating the Keyboard
To make realistic typographical errors, we first take the input character, locate the row and key index of the target character on the keyboard. Then we find the nearest key that is in the homerow. The keys on the path from the nearest homerow key to the target key are the most likely typos. To complete the set of possible typos we also find all keys within 1 key of the target key and all keys within 2 keys of the target key.
The keyboard navigation functions include
- distanceFrom
- getClosestHomeRow
- getIndexOfCharacter
- getKeysAround
Getting the Index of a Character on the Keyboard
To get the index of a character in the keyboard, loop through each row. In each row, loop through each column. If the uppercase or lowercase item is the target character, return the row and column indexes. If the match for the target character is found in the uppercase, return isUppercase = true. If the target character is not found, return undefined.
getIndexOfCharacter
1
2
3
4
5
6
7
8
9
10
11
12
13
14
15
16
17
18
19
20
21
22
23
24
25
26
27
28
29
30
31
32
33
34
35
36
37
38
39
40
41
42
43
44
45
46
47
//getIndexOfCharacter accepts a letter and finds it in the keyboard
//it will return an object with row, column, and isUppercase boolean
//if the character is not found, it will return undefined
const getIndexOfCharacter = (character, keyboard) => {
//if there's no keyboard or no character, we're not going to find an index
if (!keyboard || !character) return undefined;

    let returnIndex;

    //loop through each row
    for (let row = 0; row < keyboard.length; row++) {
        //the Array.findIndex method used below just returns a number, not an object
        //so create a variable to track if the character is uppercase out here
        let isUppercase = false;

        //pass a callback function to Array.findIndex
        //to examine each element in the array and return the index of the element that returns true
        const column = keyboard[row].findIndex(characters => {
            //if the character is not a space, and matches the upper case
            if (character !== ' ' && characters.upper === character) {
                //it's uppercase
                isUppercase = true;
            }

            //findIndex will return the index when this expression is true
            return (
                characters.upper === character || characters.lower === character
            );
        });

        //if no match is found, column will be -1
        //so if column > -1, a match has been found
        if (column > -1) {
            //set the values in returnIndex
            returnIndex = {
                row,
                column,
                isUppercase,
            };
            //and return it
            return returnIndex;
        }
    }

    return returnIndex;

};
Finding the Distance from One Key to Another
Finding the distance from one key to another is an important part of simulating the most likely typographical errors. The distanceFrom function accepts two indexes and the keyboardModel object. If the optional argument returnPath is true then the array of keys on the path from index1 to index2 will be returned in addition to the distance.
To find the distance from one key to another, we’ll decide which index is the ‘upper’ index and which is the ‘lower’ index. The upper index is the index with the lowest row number. If both indexes have the same row number, then the upper index is the index with the lowest column. We start at the lower index and move up the keyboard one key at a time to the upper index.
A single move goes from one key in the model to another adjacent key. A single move can either
- decrease the row number by one- a vertical move
- decrease or increase the column number by one - a horizontal move
- decrease the row number by one and decrease or increase the column number by one - a diagonal move
We’ll increment the distance every time we move. Once we reach the upper index, we have determined the distance and are ready to return a result.
An interesting part of solving this problem is how to deal with the offsets. Each row of keys is offset from the left side of the keyboard by some amount. The offsets in the model are the same as on my laptop keyboard. This is what the model looks like on the screen:
The offsets make some keys inaccessible by a diagonal move. Consider the diagonal move from ‘s’ to ‘c’. Row 2, column 2 is ‘s’. Row 3, column 3 is ‘c’. Without the offsets, you could make a single diagonal move up one row and over one column to move from ‘c’ to ‘s’. But if you look at the keyboard above, ‘s’ is not adjacent to ‘c’. The way we account for that in the model is whenever
distanceFrom
1
2
3
4
5
6
7
8
9
10
11
12
13
14
15
16
17
18
19
20
21
22
23
24
25
26
27
28
29
30
31
32
33
34
35
36
37
38
39
40
41
42
43
44
45
46
47
48
49
50
51
52
53
54
55
56
57
58
59
60
61
62
63
64
65
66
67
68
69
70
71
72
73
74
75
76
77
78
79
80
81
82
83
84
85
86
87
88
89
90
91
92
93
94
95
96
97
98
99
100
101
102
103
104
105
106
107
108
109
110
111
112
113
114
115
116
117
118
119
120
121
122
123
//accepts two indexes, returns a number and
//if returnPath === true, also an array of keys on the path from index1 to index2
//the first index is the target key
const distanceFrom = ({ index1, index2, keyboardModel, returnPath }) => {
//keyboard is the array of arrays with elements containing upper and lowercase characters
//the offsets are how far each row is shifted relative to others
const { keyboard, offsets } = keyboardModel;

    let distance = 0;
    //if returnPath, make an array of each key on the path
    //the path is an array of the keys on the path from index1 to index2
    //not including index1, because index1 is the target key
    const keysOnPath = [keyboard[index2.row][index2.column]];

    //if they are the same key, return
    if (index1.row === index2.row && index1.column === index2.column)
        return returnPath
            ? {
                  distance,
                  path: [],
              }
            : distance;

    //the upper index is the character closer to the top left of the keyboard
    //if index 1 and 2 are on the same row,
    // upperIndex will be the character with the lower column
    const index1IsUpper =
        index1.row === index2.row
            ? index1.column < index2.column
            : //else, upperIndex will be the character with the lower row
              index1.row < index2.row;

    const upperIndex = index1IsUpper ? index1 : index2;

    const lowerIndex = index1IsUpper ? index2 : index1;

    //the column of the index closer to the bottom of the keyboard (higher row number)
    //is offset from the from the column of the index closer to the top (lower row number)
    //by offsets[higherRow] - offsets[lowerRow]
    let offset = offsets[lowerIndex.row] - offsets[upperIndex.row];

    //start the currentPosition at the lower index
    //we'll loop and move 1 key at a time until we reach the upperIndex
    let currentPosition = {
        row: lowerIndex.row,
        column: lowerIndex.column,
    };

    //use while loop to move from currentPosition to upperIndex
    while (
        currentPosition.row !== upperIndex.row ||
        currentPosition.column !== upperIndex.column
    ) {
        //rowDifference will always be 0 or positive number
        const rowDifference = !!(currentPosition.row - upperIndex.row);

        //columnDifference may be 0, or positive or negative
        const columnDifference = currentPosition.column - upperIndex.column;

        if (rowDifference && columnDifference) {
            //large offsets make diagonals more costly
            //if the offset is greater than 0.5 when making a diagonal move
            //distance increases by one
            //this lets you correctly model the distance between keys that are staggered on the keyboard
            if (offset > 0.5) {
                offset--;
                distance++;
            }

            //make a diagonal move by decrement row and adjust column + or - as needed
            //decrement row
            currentPosition.row--;
            //if columnDifference is positive, decrement. if negative, increment
            columnDifference > 0
                ? currentPosition.column--
                : currentPosition.column++;
        } else if (rowDifference && !columnDifference) {
            //rowDifference is the difference between the lowerIndex.row and upperIndex.row
            //because lowerIndex is by definition below the upperIndex or on the same row in the keyboard model
            //rowDifference will always be positive or 0, so only decrement
            currentPosition.row--;
        } else if (columnDifference && !rowDifference) {
            //columnDifference is the difference between the columns
            //it can be positive or negative or 0,
            //depending on if the lowerIndex column is to the left or right of the upperIndex column
            columnDifference > 0
                ? currentPosition.column--
                : currentPosition.column++;
        }
        //if currentPosition is not index1
        //add currentPosition to keysOnPath array
        if (
            currentPosition.row !== index1.row ||
            currentPosition.column !== index1.column
        ) {
            //we want the array keysOnPath to be in the order Closest to index1, furthest from index1
            //if index1 is the upper index
            //then we are approaching closer to index1 with each move => use Array.unshift
            //if index1 is the lower index
            //then we are moving further away from it with each move => use Array.push
            index1IsUpper
                ? keysOnPath.unshift(
                      keyboard[currentPosition.row][currentPosition.column]
                  )
                : keysOnPath.push(
                      keyboard[currentPosition.row][currentPosition.column]
                  );
        }

        //increment distance by 1
        distance++;
    }

    //if returnPath, then return the distance and the array of keys on the path
    return returnPath
        ? {
              distance,
              path: keysOnPath,
          }
        : //else just return distance
          distance;

};
Adding Typos
Using the settings to decide whether to generate a typo
1
2
3
4
5
6
7
8
9
10
11
12
13
14
15
16
17
18
19
20
21
22
23
24
25
26
27
28
29
30
31
32
33
34
35
36
37
38
39
40
41
42
43
44
45
46
47
48
49
50
51
52
53
54
55
56
57
58
blockName: getResults
//getResults takes an input string and returns a resultArray
//resultArray contains elements with { inputCharacter, resultCharacter }
const getResults = ({ inputString, keyboardModel, settings }) =>
    inputString &&
    //use Array.from to make an array
    //then use Array.reduce to return the result character
    //resultCharacters will either be === inputChracter,
    //a typo (different character or missed character),
    //or transposed with the next input
    Array.from(inputString).reduce((results, inputCharacter, index, array) => {
        //a transposition event generates two results, so if there is already an element at this index
        //this result is the transposition of the previous input character and we don't need to generate another result
        if (results[index]) return results;

        //if a random int is lower than the frequency setting, the resultCharacters is a typo
        if (getRandomInt() < settings.frequency) {
            //if a random int is lower than the transposition setting, then the typo is a transposition
            //this index will be the input character of the inputCharacter at inputString[index + 1]
            //results[index + 1] will be the inputCharacter from this index
            const nextInputCharacter = array[index + 1];

            if (
                getRandomInt() < settings.transposition &&
                nextInputCharacter !== inputCharacter
            ) {
                const result = {
                    inputCharacter,
                    resultCharacters: nextInputCharacter,
                };

                const nextResult = {
                    inputCharacter: nextInputCharacter,
                    resultCharacters: inputCharacter,
                };

                //push both result elements to the result array
                results.push(result);
                results.push(nextResult);
            } else {
                //resultCharacters are a typo
                //call the typo function to generate the typo
                const result = {
                    inputCharacter,
                    resultCharacters: typo({
                        character: inputCharacter,
                        keyboardModel,
                        settings,
                    }),
                };
                results.push(result);
            }
        } else {
            //if there's no typo, then the resultCharacters is the same as the inputCharacter
            results.push({ inputCharacter, resultCharacters: inputCharacter });
        }
        return results;
    }, []);
Generating a mistake calls the typo function. The typo function makes use of the functions discussed above, distanceFrom, getClosestHomeRow, getIndexOfCharacter, and getKeysAround. It also uses the getMistakeCharacter function.
typo
1
2
3
4
5
6
7
8
9
10
11
12
13
14
15
16
17
18
19
20
21
22
23
24
25
26
27
28
29
30
31
32
33
34
35
36
37
38
39
40
41
42
43
44
45
46
47
48
49
50
51
52
53
54
55
56
57
58
59
60
61
62
63
64
65
66
67
68
69
70
71
72
73
74
75
76
77
78
79
80
81
82
83
84
85
86
87
88
89
90
91
92
93
94
95
96
97
98
99
100
101
102
103
104
105
106
107
108
109
110
111
blockName: typo
//the typo function is called when we want to make a typo
//it takes a single character as an input, and returns a single character
const typo = ({ character, keyboardModel, settings }) => {
    const { keyboard, offsets } = keyboardModel;

    //get the index of the character
    const inputCharacterIndex = getIndexOfCharacter(character, keyboard);

    //if no index, it's not a character on our keyboard model
    //return the character unaltered
    //you could change this to a random character if you want
    if (!inputCharacterIndex) return character;

    const { row, column, isUppercase } = inputCharacterIndex;

    //get a reference to the character element in the keyboard array
    const keyboardCharacter = keyboard[row][column];

    //could add a chance of making an error with the case of the result
    const desiredCase = isUppercase ? 'upper' : 'lower';

    //the character element may have stored typos if it has been generated before
    //if there's no stored typos, generate the values
    if (!keyboardCharacter.typos) {
        // get the closest homerow index
        const { index: homerowIndex } = getClosestHomeRow(
            inputCharacterIndex,
            keyboardModel
        );

        // get the path from the closest homerow to the character
        const path =
            //spacebar is not hit with the homerow fingers, so it gets an empty array
            character === ' '
                ? []
                : distanceFrom({
                      index1: inputCharacterIndex,
                      index2: homerowIndex,
                      keyboardModel,
                      returnPath: true,
                  }).path;

        // get the keys within 1
        // some of these errors are pretty bad, because they are on the opposite side of the target
        //from the homerow key
        const keysWithin1 =
            character === ' '
                ? //spacebar has multiple columns, so it's kind of a unique case
                  //easy enough to just special case it here
                  //grab a slice of row 4
                  [...keyboard[3].slice(1, 7)]
                : getKeysAround({
                      index: inputCharacterIndex,
                      keyboard,
                      offsets,
                  });

        // get the keys within 2
        //these are very bad errors - quite far from target key
        const keysWithin2 = getKeysAround({
            index: inputCharacterIndex,
            keyboard,
            offsets,
            distance: 2,
        });

        //store generated typo possibilities in keyboard model
        //so they don't have to be generated again
        keyboardCharacter.typos = {
            path,
            keysWithin1,
            keysWithin2,
        };
    }

    const { typos } = keyboardCharacter;

    //resultCharacters start out equal to the input character
    let resultCharacters = character;

    //if a random int is less than missedCharacters
    if (getRandomInt() < settings.missedCharacters) {
        //fail to type a character at all
        resultCharacters = undefined;
    } else {
        //didn't fail to type a character, so get a mistakeCharacter
        resultCharacters = getMistakeCharacter({
            desiredCase,
            typos,
            settings,
        });
    }

    //has a chance to generate a single extra character, for 2 total
    //if you wanted to, you could add a chance to generate multiple extra chararacters
    //all the other code should handle it fine
    if (
        resultCharacters !== undefined &&
        getRandomInt() < settings.extraCharacters
    ) {
        resultCharacters += getMistakeCharacter({
            desiredCase,
            typos,
            settings,
        });
    }

    return resultCharacters;

};
The getMistakeCharacter function uses the arrays of possible mistake keys, the settings, and the severityWeightedRandomInt function to choose the mistake character.
getMistakeCharacter
1
2
3
4
5
6
7
8
9
10
11
12
13
14
15
16
17
18
19
20
21
22
23
24
25
26
27
28
29
30
31
32
33
34
35
36
37
38
39
40
41
42
43
44
45
46
47
48
49
50
51
52
53
54
55
56
57
58
59
60
blockName: getMistakeCharacter
//needs settings, path, keyswithin1, keyswithin2, desiredcase
const getMistakeCharacter = ({
    //will return an upper or lower case character as desired
    desiredCase,
    //errors
    typos,
    //the error settings the user has chosen
    settings,
}) => {
    //get the arrays of possible typos
    const { path, keysWithin1, keysWithin2 } = typos;

    const { severity } = settings;
    //the rollTable defines the chances of selecting from the arrays
    //given the value of settings.severity
    //as severity gets larger, you become more likely to generate from the keysWithin2 array
    //when you exceed the keysWithin1 value
    const rollTable = {
        path: {
            1: 90,
            2: 75,
            3: 55,
            4: 35,
        },
        keysWithin1: {
            1: 100,
            2: 99,
            3: 90,
            4: 70,
        },
    };

    //roll is 1-100
    const roll = getRandomInt();

    if (roll < rollTable.path[severity]) {
        //75% chance key on path
        //if path.length = 0, choose from keyswithin1 instead
        return !!path.length
            ? path[severityWeightedRandomInt(0, path.length - 1, severity)][
                  desiredCase
              ]
            : keysWithin1[
                  severityWeightedRandomInt(0, keysWithin1.length - 1, severity)
              ][desiredCase];
    } else if (roll < rollTable.keysWithin1[severity]) {
        //return a key within 1 of the target key
        return keysWithin1[
            severityWeightedRandomInt(0, keysWithin1.length - 1, severity)
        ][desiredCase];
    } else {
        //return a key within 2 of the target key
        //use unweighted random, they are all dire
        return keysWithin2[getRandomInt(0, keysWithin2.length - 1)][
            desiredCase
        ];
    }

};
Animating output
If the user has animations turned on, then the output characters will be displayed one at a time as the cursor moves through the input and output boxes.
1
2
3
4
5
6
7
8
9
10
11
12
13
14
15
 //if animation setting is true, start the animation loop by invoking it with 0
    if (settings.animation) {
        //get the keyboard out of the keyboardModel object
        const { keyboard } = keyboardModel;

        animationLoop({
            display,
            index: 0,
            inputString,
            keyboard,
            prev,
            resultArray,
            settings,
        });
    }
Using setTimeout and recursion to iterate through the results array
The animationLoop function uses setTimeout and calls itself recursively to iterate through the results array generated by getResults. It calls displayOutputAtIndex to do the work of displaying the output on the page.
animationLoop
1
2
3
4
5
6
7
8
9
10
11
12
13
14
15
16
17
18
19
20
21
22
23
24
25
26
27
28
29
30
31
32
33
34
35
36
37
38
39
40
41
42
43
44
45
46
47
48
49
blockName: animationLoop
//animation loop will call displayOutputAtIndex for each character in the inputString
//then it will wait 1 second and clear the highlights from the keyboard
const animationLoop = ({
    display,
    index,
    inputString,
    keyboard,
    prev,
    resultArray,
    settings,
}) => {
    //use setTimeout to delay execution of the displayOutput
    setTimeout(() => {
        //call the displayOutputAtIndex function
        //displayOutputAtIndex makes all the visible changes to the page
        displayOutputAtIndex({
            display,
            index,
            inputString,
            keyboard,
            prev,
            resultArray,
            settings,
        });

        //if there are still characters left in the input string, recursively call animationLoop with the next index
        if (index++ < inputString.length - 1) {
            animationLoop({
                display,
                index,
                inputString,
                keyboard,
                prev,
                resultArray,
                settings,
            });
        } else {
            //if we have done every character in the input string
            resetDisplay({
                display,
                inputString,
                keyboard,
                prev,
            });
        }
    }, 500);

};
displayOutputAtIndex makes all the changes visible on the page. It displays the current input and current output in the big fields at the top of the screen. It calls advanceOutputCursor to take care of cursor animation.
displayOutputAtIndex
1
2
3
4
5
6
7
8
9
10
11
12
13
14
15
16
17
18
19
20
21
22
23
24
25
26
27
28
29
30
31
32
33
34
35
36
37
38
39
40
41
42
43
44
45
46
47
48
49
50
51
52
53
54
55
56
57
58
59
60
61
62
63
64
65
66
67
68
69
70
71
72
73
74
75
76
77
78
79
80
81
82
83
84
85
86
87
88
89
90
91
92
93
94
95
96
97
98
99
100
101
102
103
104
105
106
107
108
109
110
111
112
113
114
115
116
117
118
119
120
121
122
123
124
125
126
127
128
129
130
131
132
133
134
135
136
137
138
139
140
141
142
143
144
145
146
147
148
149
150
151
152
153
154
155
156
157
158
159
160
161
162
163
164
165
166
167
168
169
170
171
172
173
174
175
176
177
178
179
180
181
182
183
184
185
186
187
blockName: displayOutputAtIndex
//display output at index takes the result array and the index
//and displays the input character, the result character
//and highlights the intended key and the mistakes
//it also calls the advance output cursor function that moves the cursor
//in the input textarea and output div
const displayOutputAtIndex = ({
    //object containing references to display elements on the page
    display,

    //the target index in the result array
    index,

    //the complete input string, used to highlight the input textarea
    inputString,

    //array of arrays representing the keyboard
    keyboard,

    //object containing values from the previous loop
    prev,

    //the array of input characters and result characters
    resultArray,

    //the settings the user has chosen
    settings,

}) => {
//get reference to the elements on the page
const { arrowSpan, currentInputSpan, currentOutputSpan } = display;

    //remove the highlight from the previous key
    //prev.key is a reference to the <span> element
    if (!!prev.key) {
        prev.key.classList.remove('highlighted');
        prev.key.classList.remove('mistake');
    }

    //clear the currentMistakeSpan
    //and remove the mistake styling from the previous mistake key
    if (prev.mistakes) {
        prev.mistakes.forEach(
            prevMistake =>
                prevMistake && prevMistake.classList.remove('mistake')
        );
        arrowSpan.style.color = null;
    }

    //highlight the input field only at the given index
    highlightInputAt({ input: inputString, index });

    const { inputCharacter, resultCharacters } = resultArray[index];

    currentInputSpan.innerHTML = asInnerHTML(inputCharacter);
    currentOutputSpan.innerHTML = asInnerHTML(resultCharacters);

    const charIndex = getIndexOfCharacter(inputCharacter, keyboard);

    //no character index means it's not a character modeled in the keyboard
    if (!charIndex) {
        //we don't generate mistakes for characters not on the keyboard
        advanceOutputCursor({
            display,
            isMistake: false,
            prev,
            resultCharacters,
        });

        //record the resultCharacters for the next loop iteration
        prev.characters = resultCharacters;
        return;
    }

    const { row, column, isUppercase } = charIndex;

    //match the displayed case to the current character
    isUppercase
        ? displayCase('upper', keyboard)
        : displayCase('lower', keyboard);

    //all the key spans are labeled with the lowercase characters
    const inputCharacterLowercase = keyboard[row][column].lower;

    //get the span that represents the input character
    const key =
        inputCharacterLowercase &&
        document.getElementById(`keyCharacter${inputCharacterLowercase}`);

    //highlight the key
    key && key.classList.add('highlighted');

    //set the frequency of the beep noise
    //beep noise is lower if the row is farther down the keyboard
    let frequency = 600;
    !!row && (frequency = -row * 100);
    //duration is 50 milliseconds
    let duration = 50;

    //if the character in the result array doesn't match
    //the input character, then there's a typo, isMistake is true
    const isMistake = resultCharacters !== inputCharacter;

    if (isMistake) {
        //set frequency and duration to the unpleasant mistake noise
        frequency = 100;
        duration = 250;

        //turn the arrow red, indicating a mistake
        arrowSpan.style.color = 'red';

        //when resultCharacters undefined- the typo was failing to type a character
        if (!resultCharacters) {
            //highlight the input key as a mistake
            key && key.classList.add('mistake');

            advanceOutputCursor({
                display,
                isMistake,
                prev,
                resultCharacters,
            });

            prev.characters = undefined;
            //advance output cursor can look at prev.mistakes and see that a mistake was made
            //but also that the mistake was not a key
            prev.mistakes = [null];
        } else {
            //resultCharacters may have more than one character
            //so make an array out of the string and iterate through it
            //to get an array of references to the key <span>s
            const mistakeKeys = Array.from(resultCharacters).map(char => {
                const { row, column } = getIndexOfCharacter(char, keyboard);
                const mistakeCharacter = keyboard[row][column].lower;

                const mistakeKey = document.getElementById(
                    `keyCharacter${mistakeCharacter}`
                );

                return mistakeKey;
            });

            //highlight each mistake key in red
            mistakeKeys.forEach(mistakeKey =>
                mistakeKey.classList.add('mistake')
            );

            //advance the output cursor
            advanceOutputCursor({
                display,
                isMistake,
                prev,
                resultCharacters,
            });

            prev.mistakes = mistakeKeys;
        }
    } else {
        arrowSpan.style.color = '#39ff14';

        //no mistake was made
        //if there are result characters
        !!resultCharacters &&
            //advance the output cursor
            advanceOutputCursor({
                display,
                isMistake,
                prev,
                resultCharacters,
            });

        //next iteration, any function that examines the prev.mistakes
        //will see that there were no mistakes made
        prev.mistakes = undefined;
    }

    //set prev.key to the the span element for the current key
    prev.key = key;
    //set prev.characters to the resultCharacters for the current key
    prev.characters = resultCharacters;

    //if beeps are on
    //beep at the frequency for the duration
    const { audioContext, beeps } = settings;
    beeps && beep({ audioContext, duration, frequency });

};
Making the cursor appear
Call highlightInputAt to make the cursor appear in the input field.
highlightInputAt
1
2
3
4
5
6
7
8
9
10
11
12
13
14
15
16
17
18
19
20
21
22
blockName: highlightInputAt
//adds a cursor to the 'highlights' div behind the input textarea
//at the requested index, highlighting the text in the input textarea
//if index is undefined, no mark will be added to the input, clearing the highlights
const highlightInputAt = ({ input, index }) => {
    //when clearhighlights is true, no mark element will be added to the input string
    if (!input.length) {
        return;
    } else if (index && input[index]) {
        //but if an index is defined, then a mark will be added, highlighting the index
        input = `${input.slice(0, index)}<mark>${input.charAt(
            index
        )}</mark>${input.slice(index, input.length)}`;
    }

    //get reference to the highlights div
    const highlights = document.getElementsByClassName('highlights')[0];
    //set innerHTML equal to the input text with a mark element
    //this will show through the textarea div in front
    highlights.innerHTML = input;

};
Call advanceOutputCursor to make the cursor appear in the next space in the output field.
advanceOutputCursor
1
2
3
4
5
6
7
8
9
10
11
12
13
14
15
16
17
18
19
20
21
22
23
24
25
26
27
28
29
30
31
32
33
34
35
36
37
38
39
40
41
42
43
44
45
46
47
48
49
50
51
52
53
54
blockName: advanceOutputCursor
//move the cursor forward one character
const advanceOutputCursor = ({
    display,
    isMistake,
    prev,
    resultCharacters,
}) => {
    //find the outputDiv
    const { outputDiv } = display;

    //get prevCharacters and prevInnerHTML out of prev
    let { characters: prevCharacters, innerHTML: prevInnerHTML } = prev;

    //break Tag
    const breakElement = '<br/>';

    //the mark element open tag
    const normalOpen = '<mark>';

    //if there's a mistake, add a <mark class="mark__mistake">
    const mistakeOpen = '<mark class="mark__mistake">';

    //if there is a mistake, use the mistake open tag
    //otherwise the normal open tag
    const markOpenTag = isMistake ? mistakeOpen : normalOpen;

    const markCloseTag = '</mark>';

    //if resultcharacters is a newline, add a br element
    isNewline(resultCharacters) && (resultCharacters = breakElement);

    //if prevCharacters were a newline, set prevCharacters equal to <br/>
    isNewline(prevCharacters) && (prevCharacters = breakElement);

    //newInnerHTML starts the same as prevInnderHTML
    let newInnerHTML = prevInnerHTML;

    //if there are characters to add
    if (resultCharacters) {
        //newInnerHTML prevInnerHTML with mark tags and the result characters
        newInnerHTML += `${markOpenTag}${resultCharacters}${markCloseTag}`;

        //referencing prev.innerHTML directly changes the prev object
        //prev.innerHTML gets the result characters added without mark tags
        //this will persist to the next loop
        prev.innerHTML += resultCharacters;
    }

    //display the innerHTML
    //the mark will highlight one letter and look like a moving cursor
    outputDiv.innerHTML = newInnerHTML;

};
Making noise
Clicking the Go button calls makeAudioContext
1
2
3
4
5
6
7
8
9
10
11
12
13
14
15
blockName: goButtonListener
//make clicking the 'GO' button invoke the addTypos function
    document.getElementById('addTyposButton').addEventListener('click', () => {
        //if beeps are on and audioContext is undefined, call the makeAudioContext function
        //we don't do this until the user clicks
        //because you can't create an audio context without some action by the user
        settings.beeps && !settings.audioContext && makeAudioContext(settings);

        //use .bind to pass the keyboardModel and settings to the addTypos function
        addTypos.bind(null, {
            display,
            keyboardModel,
            settings,
        })();
    });
Making the audioContext
1
2
3
4
5
6
7
8
blockName: makeAudioContext
//if the audioContext hasn't been initialized yet, then initialize it
//audioContext allows browsers to play sounds
const makeAudioContext = settings =>
    !settings.audioContext &&
    //some browswers use audioContext, others use webkitAudioContext
    //set audioContext equal to a new instance of whichever returns true from the browswer
    (settings.audioContext = new (AudioContext || webkitAudioContext)());
beep uses audioContext to play tones. All functions can call beep when they need to play tones.
beep
1
2
3
4
5
6
7
8
9
10
11
12
13
14
15
16
17
18
19
20
21
22
23
24
25
26
27
28
29
30
31
32
33
34
35
36
37
38
blockName: beep
//plays a beep at the given frequency for the duration
const beep = ({ audioContext, duration, frequency }) => {
    //oscillator is an oscillatorNode => https://developer.mozilla.org/en-US/docs/Web/API/OscillatorNode
    const oscillator = audioContext.createOscillator();

    //the type of wave function is 'square'
    //there are a few types and they all sound different
    oscillator.type = 'square';

    //connect the oscillator to the audioContext destination
    //the destination is the device that makes sound, usually the speakers
    //https://developer.mozilla.org/en-US/docs/Web/API/BaseAudioContext/destination
    oscillator.connect(audioContext.destination);

    //set the oscillator to the requested frequency
    oscillator.frequency.value = frequency;

    //oscillatorNode.start starts playing the sound
    //if oscillator has the start method, invoke it
    if (oscillator.start) oscillator.start();
    //for webkit, invoke noteOn() method
    else oscillator.noteOn(0);

    //after starting the tone, run setTimeout to stop the tone
    setTimeout(
        () => {
            //oscillatorNode.stop specifies the time to stop playing
            //if oscillator has the stop method, invoke it when the setTimeout runs
            if (oscillator.stop) oscillator.stop(0);
            //for webkit, invoke noteOff() method
            else oscillator.noteOff(0);
        },
        //setTimeout will run the code inside after the duration in milliseconds
        duration
    );

};
The displayOutputAtIndex function plays a tone that is higher or lower depending on what keyboard row the output character is located in.
    //set the frequency of the beep noise
    //beep noise is lower if the row is farther down the keyboard
    let frequency = 600;
    !!row && (frequency = -row * 100);
    //duration is 50 milliseconds
    let duration = 50;
That’s it!
This was a fun project. I learned a lot about working with JavaScript without using advance frameworks.