Comments on Code Line Numbers in Jekyll
When I write a blog post about my code, I want to write information that is detailed enough that beginners won’t get lost. Because a single line or block of code can include many different operations, it can be difficult to present the whole function, the specific code you are talking about, and the explanation for what the code is doing all in a clearly visually connected way. So I decided to make it possible to float comment boxes next to specific lines of code. That way the explanation is clearly visually connected to the code that is being explained. This helps the reader keep the ideas connected, while saving vertical screen space.
Here’s a block of code with line numbers and a comment pointing to line 7:
1
2
3
4
5
6
7
8
9
10
11
//takes an element and returns the top offset property
//the distance from the top of the screen in pixels
//calculates by recursively adding the top offset of each parent element
const getOffsetTop = element => {
let offsetTop = 0;
while (element) {
offsetTop += element.offsetTop;
element = element.offsetParent;
}
return offsetTop;
};
This is the code inside the while loop. It will execute as long as the variable element returns a truthy value. += is the addition assignment operator. Here, it is adding the value of the offSetTop property of the current element to the value of the variable named offsetTop.
Excellent, right? Want to know how it works?
How it Works
When the user writes a Jekyll post, they can use Liquid Tags to highlight their code blocks. If they want to, they can tell Jekyll to add line numbers to the code block.
We use JavaScript to find the line numbers for each code block. Each line number is put inside a div and assigned an id. When the user writes a lineComment in their post, they put the lineComment inside of a div. The user assigns the lineComment a code block number and a line number using the div id property. We set the Jekyll config to render markdown inside of HTML elements, so the user can write their comment using markdown syntax even though it is inside of a div.
When the page is rendered we run a JavaScript function to find each code block and each lineComment. For every code block we run a JavaScript function to find the assigned lineComments. For every lineComment in a block we find the assigned line number, reposition the comment to the left of the assigned line number, and use CSS to apply styling to the comment.
Finally, we use JavaScript to listen for the page resize event. When the page resizes, we run the code to position each comment again. That way the comments will stay in the correct position if the user resizes the page.
Source Code
The explanations on this page go over the important code. But it doesn’t cover everything. The complete source code can be found at the links below.
CSS: https://github.com/jacobwicks/lineComments/blob/master/lineComments.css
HTML: https://github.com/jacobwicks/lineComments/blob/master/lineComments.html
JavaScript: https://github.com/jacobwicks/lineComments/blob/master/lineComments.js
Highlighting Code with Liquid Tags
When you type a code block in a Jekyll post, you can tell Jekyll to highlight the code block using Liquid Tags. Liquid Tags are inside curly brackets and percent signs. The starting and ending Liquid Tags for highlighting JavaScript look like this:
{% highlight javascript %}
const helloWorld = () => console.log('Hello World!');
{% endhighlight %}
That will render on the page as this:
const helloWorld = () => console.log('Hello World!');To add line numbers, you add ‘linenos’ to the opening tag:
{% highlight javascript linenos %}
That will render on the page as this:
1
 const helloWorld = () => console.log('Hello World!');
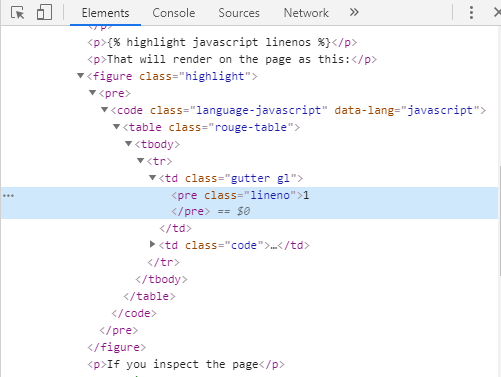
If you inspect the page, you can see the line numbers sitting inside of a <pre> element. You can inspect the page using your browser’s console, or on some browsers there is an ‘inspect element’ item in the right click menu.
And here’s what it would look like if we had 9 lines of code instead of just 1:

These line numbers are what we want the comment boxes to line up with.
The JavaScript
We use JavaScript and CSS to create the comment boxes. First let’s look at the JavaScript. After that, I’ll explain how the CSS works. Then I will tell you how to add it to your Jekyll site.
Most of the JavaScript is inside of a function called positionAllComments. On this page, I’ll explain the major parts of positionAllComments and some of the important helper functions. If you want to see all of the JavaScript, you can look at the source code here. There are a few pieces of code that should only run when the page is loaded. So positionAllComments takes one argument, reposition. When the page is loaded, positionAllComments is invoked with reposition undefined. When the page is resized, positionAllComments is invoked with reposition true. So some code will only be executed if reposition is false. That code will only run when the page is loaded, not each time the user resizes the page.
Use JavaScript to Add Ids so You Can Find the Line Numbers
This code finds each element that has the ‘lineno’ class. Then it adds a div with an id to each line number inside each ‘lineno’ element.
1
2
3
4
5
6
7
8
9
10
11
12
13
14
15
16
17
18
//get the line number element for each code block
const codeBlocks = [...document.getElementsByClassName('lineno')];

    //for each code block line number element
    //turn each line number into a div with an id
    codeBlocks.forEach((codeBlock, blockIndex) => {
        let lineNumbers = codeBlock.innerHTML
            .split('\n')
            .map(
                lineNumber =>
                    `<div id='block.${blockIndex}.line.${
                        lineNumber ? lineNumber : 'last'
                    }'>${lineNumber}</div>`
            )
            .join('');
        //set the innerHTML of the codeblock linenumber container
        codeBlock.innerHTML = lineNumbers;
    }
Use getElementsByClassName to find each element with the class ‘lineno.’
Weirdly, getElementsByClassName does not return a JavaScript array. It returns an ‘array-like’ item. But the return value does not have any of the JavaScript Array methods available.
We want to use the Array methods, so use the spread operator and a pair of brackets to turn the result into an actual Array.
The innerHTML of the codeBlock element is a string with all the line numbers and newline characters.
Use String.split to turn the string into an array, with one element for each line number.
Use Array.map to make a new array out of the array of line numbers.
The fat arrow ‘=>’ signifies an anonymous function. The anonymous function returns a Template Liteal. We can put the value of variables into a string literal using ${value}.
This function will return a valid HTML string with a div in it. The content of the div will be a line number. The div will have an id in the format of “block.1.line.7”. We’ll use the HTML api method getElementById to find the div later, if a comment has been attached to it.
Use Array.join to make the array of strings that we created on line 9 into one single string.
Once we set the innerHTML of the codeBlock element, it will be full of divs with ids that we can search for when we need to find lines of code.
Now the line numbers element will look like this:
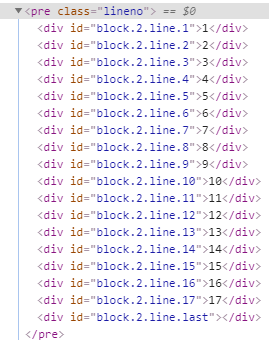
Each line number can be found by using document.getElementById. Once we have found a div, we can find its position on the page.
Writing a lineComment
Jekyll posts may contain HTML tags. They will render on the page normally. To write a lineComment the user has to write a div, assign the div the class “lineComment”, and give the div an id. The id will contain the block number and the line number, separated by periods. We’ll use JavaScript to find lineComments, and split the id property to find the assigned block number and line number.
<div class = "lineComment" id="block.2.line.17">
Comment content goes here.
</div>
Make Jekyll Parse Markdown Inside of HMTL
HTML in Jekyll may contain markdown. To tell Jekyll to parse markdown inside HTML elements, add the following lines to the _config.yml file:
markdown: kramdown
kramdown:
    parse_block_html: true
In a default Jekyll setup, the _config.yml file is in the root directory of the Jekyll site.
kramdown is what Jekyll uses to parse markdown. parse_block_html tells kramdown to parse markdown in block HTML tags.
Find Each Code BLock That Has Line Numbers
To assign the comments to the correct blocks and line numbers, we first need to find each code block that has line numbers. We’ll assign the array of code blocks to codeBlocks.
const codeBlocks = [...document.getElementsByClassName('lineno')];document.getElementsByClassName finds all elements on the page with the given class name. It returns an ‘array-like’ object. You can find elements in the array-like object by index, but the JavaScript Array methods are not available on it.
Use the spread operator … inside of a pair of angle brackets to make the array-like object into a JavaScript array.
Now we have the array codeBlocks that contains a reference to the ‘lineno’ element from each code block with line numbers. Inside those elements are the divs with line numbers that we created earlier.
Find Each lineComment div
Finding all the lineComment divs the user created is similar to finding all the code blocks with line numbers.
const comments = [...document.getElementsByClassName('lineComment')];comments is an array that contains all the lineComments in the post. We’ll filter the comments array to find all the comments assigned to a particular code block.
For Every Code Block, Find All the Assigned Comments
We’ll find all the comments assigned to a particular block and put them in an array named blockComments. Once we have blockComments, we can add styling to each comment inside blockComments. We will also set the position of each comment.
1
2
3
4
5
6
7
8
9
10
11
12
13
14
15
16
17
18
19
20
21
//get the highest line number from the codeBlock
const highestLineNumber = parseInt(
[...codeBlock.childNodes][codeblock.childnodes.length - 2].innerHTML
);

        //filter to find the comments that are supposed to go in this block
        const blockComments = comments
            .filter(comment => getBlockNumber(comment) === blockIndex)
            //sort the comments by lineNumber, lowest to highest
            .sort((a, b) => getLineNumber(a) - getLineNumber(b))
            //remove comments with a lineNumber higher than the number of lineNumbers in the code block
            .filter(comment => {
                const lineNumber = getLineNumber(comment);
                const validLinenumber =
                    lineNumber > -1 && lineNumber <= highestLineNumber;
                //if the line number is not valid, add the invalid line number class
                //this will draw the users attention to their attempt to assign a lineNumber comment to an invalid line number
                !validLinenumber && invalidCommentAssignment(comment);

                return validLinenumber;
            });
highestLineNumber is the number inside the last line number div. We can use it to determine if a comment assigned to this block has been given an invalid line number.
Use Array.filter to return an array with only the comments assigned to this code block.
All of this code is inside of a call to codeBlocks.forEach, which is where we assign the value of the blockIndex variable.
The invalidCommentAssignment function takes a function, adds a label with the assigned block and line numbers, and gives it a css class that turns it bright red. That way the user can see that they have assigned the comment an invalid block and/or line number.
Position Each Comment
We have the array blockComments that contains every comment assigned to this block. This code puts each comment in the correct position.
1
2
3
4
5
6
7
8
9
10
11
12
13
14
15
16
17
blockComments.forEach((comment, commentIndex) => {
//get the assigned line number
const lineNumber = getLineNumber(comment);

            //generate the id of the target comment
            const commentId = `block.${blockIndex}.line.${lineNumber}`;

            //use getElementById to find the div that contains the line number
            const targetLine = document.getElementById(commentId);

            //find the vertical position of the line number
            const topOffset = getOffsetTop(targetLine);

            //set the position of the comment
            comment.style.width = `${commentWidth}px`;
            comment.style.top = `${topOffset}px`;
            comment.style.left = `${leftOffset - commentWidth - 48}px`;
The getLineNumber function takes a comment and returns the lineNumber from the comment’s id property.
targetLine is a reference to the element that contains the line number. By finding the position of targetLine on the page we can get the numbers we need to set the position of this comment.
The getOffsetTop function finds how far the element is from the top of the page. The code for getOffsetTop is shown below.
commentWidth is calculated earlier based on the width of the wrapper element created by Jekyll. commentWidth will be reduced if the screen is very narrow.
leftOffset is calculated earlier. leftOffset is calculated using a function that works like the getOffSetTop function shown below.
Using Offsets To Find the Position of a Line Number div On the Page
To line the comments up with a div, we need to know where the top of that div is. Here’s the function that takes an element and returns the top offset, which is how far in pixels the top of the element is from the top page. Because the offsetTop property of each element tells us what its top offset is relative to the parent of that element, we have to add the offset of all the parent elements together to get the correct number. Use a while loop to loop to go through each parent of the element.
1
2
3
4
5
6
7
8
9
10
11
12
13
14
15
16
17
18
19
//takes an element and returns the top offset property
//the distance from the top of the screen in pixels
//calculates by recursively adding the top offset of each parent element
const getOffsetTop = element => {
let offsetTop = 0;

    //while element evaluates to true
    while (element) {
        //add the offset of the element to offsetTop
        offsetTop += element.offsetTop;

        //set element to offsetParent
        //offsetParent will eventually be undefined
        element = element.offsetParent;
    }

    return offsetTop;

};
+= is the addition assignment operator. Adds to a variable and assigns the result as the new value.
The HTMLElement.offsetParent property of an element returns a reference to the nearest parent element.
There’s a similar function that finds the leftOffset, which is how far from the left side of the screen an element is. You can see that function in the full source code.
Adding Classes to Style the lineComment
This code adds a label and some styling to the content of the lineComment. This code will only run when the page loads, because positionAllComments will be called with a falsy value for reposition. When the page is resized, reposition will be truthy and this code will not be executed again.
1
2
3
4
5
6
7
8
9
10
11
12
13
14
15
16
17
18
19
20
21
22
23
24
25
26
27
28
29
30
31
32
33
34
35
36
37
38
39
40
//first time through add the line label and content div inside the comment
//don't need to do it when repositioning
if (!reposition) {
//this comment gets the comment container style applied
comment.classList.add('line_comment_container');

 //get the content of the comment
const content = comment.innerHTML;

                //add a label span to the content
                const label = `Line: ${lineNumber}`;
                const labeledContent = addLabelToContent({ content, label });

                //the class is line_comment_content
                //which is max_height of 3 lines when collapsed
                let classList = 'line_comment_content';

                //returns undefined or the line number of the next comment
                const nextCommentLineNumber =
                    blockComments[commentIndex + 1] &&
                    getLineNumber(blockComments[commentIndex + 1]);

                //if the next comment is closer than 4 lines
                //make this comment_content single_height, so max_height of 1 line
                if (
                    nextCommentLineNumber !== undefined &&
                    nextCommentLineNumber - lineNumber < 4
                ) {
                    //make the comment container single height
                    comment.classList.add('single_height');
                    //content classList also has single height
                    classList += ' single_height';
                }

                //put the labeled content inside a div with the container classList
                const newContent = `<div class="${classList}">${labeledContent}</div>`;

                //set the comment innerHTML to the new div
                comment.innerHTML = newContent;
            }
The addLabelToContent function takes a content string and inserts a <span> element with the label string into it.
The classes applied to the content will affect how many lines it takes up on the screen when the comment is collapsed.
If there is a next comment in the blockComments array, find its line number so that we can see if it is within 3 lines of this comment’s line number. Remember, the comments inside blockComments are sorted by line number, so we know that the next comment is the comment with the next line number.
Use a template literal to create a div with the class line_comment_container. Put the labeled content inside it.
Run on Page Load
To run positionAllComments when the page load, make an Immediately Invoked Function Expression (IIFE). In ES2015, a standalone pair of curly brackets creates an IIFE. The code inside the curly brackets will be executed when the page loads, so when the page loads it will call positionAllComments(). Notice that we are calling positionAllComments with the reposition argument undefined, so all the code that is supposed to run when the page loads will run.
{
positionAllComments();
}
Listen for Page Resize
Running positionAllComments when the page loads will put the comments in the right place when the page loads for the first time. But to make the comments stay in the right place when the user resizes the page, we need to listen for the resize event. Use addEventListener to listen for the resize event happening on the window.
//a debounced function handles repeated calls by waiting until the calls stop
//then calling itself once
//resize events can happen repeatedly, don't want to run the code that many times
const debouncedPositionAllComments = debounce(positionAllComments);

//the event listener passes the event as an argument,
//so the parameter reposition will be true
window.addEventListener('resize', debouncedPositionAllComments);
Resizing the page can fire the event listener many times very quickly. Running complicated code many times in a row can cause the page to slow down or not work right. So the event listener isn’t calling positionAllComments. It is calling the variable debouncedPositionAllComments. This is a ‘debounced’ version of the positionAllComments function.
Debouncing is when you make sure that repeated, quick calls to a function only end up calling that function a single time. By passing a debounced version of positionAllComments to the event listener, we make sure that positionAllComments only gets called once when the user resizes the window. If we didn’t debounce it, positionAllComments might get called hundreds of times a second, which would cause the page to slow down. In the full source code you can see the debounce function that we call to create the debounced version of positionAllComments.
When the eventListener calls debouncedPositionAllComments, it automatically passes the event object as an argument to debouncedPositionAllComments. debouncePositionAllComments calls positionAllComments. positionAllComments will read the event object as its parameter reposition, so reposition will have a truthy value. That will stop the code that is only supposed to execute when reposition is falsy from executing.
The CSS
We use CSS to accomplish several things. We use CSS to set the background color of the comment, create the shaft and head of the arrow pointing the line number, and collapse and expand the comments when the user hovers over them.
This article on CSS-Tricks.com explains the different ways of using CSS to animate changes in the height of an element where the height is automatically determined based on the size of the element’s content. Each method has some benefits and some drawbacks. I chose to use max-height because it works well enough for this application and involves very few lines of code.
The Line Height Variable
/_ declaring a variable lh as 1.4rem, or 1.4 times the height of a single line of text
line-height is equal to the value of the variable lh _/
html {
--lh: 1.4rem;
line-height: var(--lh);
}
Here we declare a CSS variable lh. By declaring lh as a CSS variable, we can refer back to it throughout the CSS. We can use lh in calculations.
lh is equal to 1.4 rem. The CSS unit rem is the font size of the root element of the document. This basically means it’s how tall in pixels the font characters will be. Multiplying rem by 1.4 gives us a height value that accounds for one character in height plus white space above and below it.
We’ll use lh later to set the collapsed height of the comments to either 3 lines or 1 line, depending on if there are other comments close by.
Line Comment Container, Before and After
This section of CSS specifies the properties for the line_comment_container class. We use the before pseudo element to make the shaft of the arrow that points at the assigned line number. We use the after pseudo element to make the point of the arrow that points at the assigned line number.
1
2
3
4
5
6
7
8
9
10
11
12
13
14
15
16
17
18
19
20
21
22
23
24
25
26
27
28
29
30
31
32
33
34
35
36
37
38
39
40
41
42
43
44
/_ the before element of the line_comment_container
creates the shaft of the arrow pointing at the line number _/
.line_comment_container::before {
content: '';
width: 0;
height: 0;
border-top: 10px solid;
border-bottom: 10px solid;
border-left: 25px solid;
border-right: 20px solid;
border-color: gray;
position: absolute;
right: -20px;
top: 0px;
}

/_ the line comment container holds the contents
and displays the background color
its default state is collapsed, displaying a maximum of 3 lines of text
max-height is set to 3 _ the lh variable*/
.line_comment_container {
border-top: medium solid white;
position: absolute;
background-color: gray;
text-align: left;
border-radius: 6px;
padding: 5px;
max-height: calc(var(--lh) * 3);
transition: max-height 1s ease-out;
}

/_ the after element of the line_comment_container
creates the point of the arrow pointing at the line number _/
.line_comment_container::after {
content: '';
width: 0;
height: 0;
border-top: 20px solid transparent;
border-bottom: 20px solid transparent;
border-left: 30px solid gray;
position: absolute;
right: -50px;
top: -10px;
}
Setting each of the border properties forms a rectangle.
The body of the arrow is placed 20 pixels back from the right side of the comment.
Setting the border-top to white makes the separation between comments visible when they overlap. Overlap will occur if there is a comment on the line after another comment.
The CSS calc() function lets you perform calculations inside CSS property values. max-height is set to three times the value of the lh variable, or 3 lines of text plus whitespace.
The transition property allows you to control how an element will change appearance when a property of the element changes. This line says that when the max-height property changes, it should take 1 second to change, and ease-out is an animation that starts slow and ends slow, moving faster in the middle.
Setting border-left to gray and border-top and border-bottom to transparent creates a triangle pointing right.
The head of the arrow is position to the right of the line_comment_container.
Hover Effects
When the user hovers the mouse over a comment, comment expands to the height of its content, the background gets lighter, and the arrow turns green.
1
2
3
4
5
6
7
8
9
10
11
12
13
14
15
16
17
/_ when the user hovers over the line_comment_container
max-height is set to 100% of the viewport height_/
.line_comment_container:hover {
background-color: lightgray;
max-height: 100vh;
z-index: 99;
}

/_ the point of the arrow turns green _/
.line_comment_container:hover:after {
border-left: 30px solid green;
}

/_ the body of the arrow turns green _/
.line_comment_container:hover:before {
border-color: green;
}
Setting the z-index puts the hovered comment on top of any other comments it may overlap.
The Content
The line_comment_content class controls the max-height of the content of the comment. We need to have this separate class for the content of the comment because we use overflow: hidden to hide any text that goes past the max-height. If we set overflow: hidden on the line_comment_container, then the before and after pseudo elements wouldn’t show up because we render them outside of the body of the line_comment_container to create the pointing arrow effect.
1
2
3
4
5
6
7
8
9
10
11
12
13
14
/_ the content of the comment
max-height starts at three lines collapsed _/
.line_comment_content {
position: relative;
max-height: calc(var(--lh) \* 3);
transition: max-height 1s ease-out;
overflow: hidden;
padding-right: 1rem;
}

/_ when hovered, max height becomes 100% of the viewport height _/
.line_comment_content:hover {
max-height: 100vh;
}
On hover max-height is set to 100vh, or 100% of the height of the viewport. The CSS vh unit is equal to 1% of the height of the viewport. The viewport is the browser window size.
Make lineComments Work On Your Jekyll Blog
To make lineComments work on your Jekyll Blog, you need to do 4 things.
Tell Jekyll to Parse Markdown Inside of HTML Elements
add the following lines to the _config.yml file:
markdown: kramdown
kramdown:
    parse_block_html: true
kramdown is what Jekyll uses to parse markdown. parse_block_html tells kramdown to parse markdown in block HTML tags.
Put lineComments.css and lineComments.js in the Assets Folder of the Jekyll Blog
If you don’t already have a folder named assets in the root folder of your Jekyll Blog, then create one.
Create a folder named lineComments inside the assets folder.
Save lineComments.css in the folder assets/lineComments/. lineComments.css has all the CSS that makes the comments work.
Save lineComments.js in the folder assets/lineComments/. lineComments.js has all the JavaScript that makes the comments work.
Put lineComments.html into the _includes Folder of the Jekyll Blog
If you don’t already have a folder named _includes in the root folder of your Jekyll Blog, then create one. Jekyll includes let you use Liquid Tags to include contents from a file in the _includes folder.
Save lineComments.html in the _includes folder. lineComments.html brings lineComments.css in as a stylesheet, and lineComments.js in as a script. This is what is in lineComments.html:
<link
    rel="stylesheet"
    type="text/css"
    href="/assets/lineComments/lineComments.css"
/>
<script src="/assets/lineComments/lineComments.js"></script>
Add the Include Tag to the Bottom of Any Post that You Want lineComments in
Add this line to the bottom of any post that you want to use lineComments in. It has to be at the bottom of the post so that the JavaScript runs after the comment divs are rendered to the page.
{% include lineComments.html %}
Now You Can Use lineComments in Your Jekyll Blog
To write a lineComment you need to put the comment inside of a div. Assign the div the class “lineComment”. Give the div an id in the correct form. The correct id form is “block.#.line.#” where the # symbols are the desired block number and line number.
<div class = "lineComment" id="block.2.line.17">
Like this
</div>;
The div content MUST not start on the same as the div opening tag. You have to have a linebreak. If you start typing the content on the same line as the div opening tag Jekyll won’t parse it correctly.
<div class = "lineComment" id="block.2.line.17"> This won't work!
</div>;
That’s it!